Inspection/Quality Control
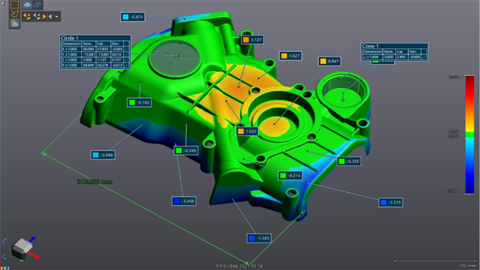
Inspection/Quality Control is accomplished using computer-aided inspection uses powerful software tools to analyze digital data and compare it with other desired digital models. Any manufactured part can be compared against its original design intent to find out various dimensional irregularities easily. By inspecting die and mold inserts, wear and tear can be determined, even on freeform surfaces. Since the high-resolution 3d scanning captures millions of x,y, and z points on the surface of the measured part, 100% coverage of the visible surface is inspected.
- Inspect your part, die or mold for dimensional flaws
- High-resolution data covers 100% of the features on the part
- View the results in easy-to-understand color plots
- Ability to generate customized reports
- Digital mock-up solves difficult assembly problems

We use the latest technology in white light, blue light, laser, and CT type 3D scanning to deliver fast, accurate, and easy-to-understand inspection/quality control reports. We do this in an affordable, efficient, and flexible way. Our reports are highly customized for every client, and only contain reporting on different variables, features, and dimensions that are related to the current problem. Some of the great inspection tools that we provide in our reports are easy-to-read color map reports, well-defined CAD-to-scan data cross sections with the dimensions of interest, scan data-to-CAD overlays, GD&T reporting, and digital assembly interference reporting. Another new and powerful reporting feature is the 3D pdf report, which is basically the color-mapped inspection report of the part, displayed in 3d, and can be rotated/viewed in Adobe Reader, just like a CAD model.


